Pages

Thursday, November 8, 2012

How to Reset Windows 7 Password without any Software?

There are many Windows 7 users who forget their windows login password and face many problems to recover or reset it. These Windows 7 users are always in search of method (manual or automatic) which can help them to recover lost password. So here I am writing about how to reset Windows 7 password without any software.The only resource user need to follow this method is a bootable Windows 7 Installation Disk.
1. Make CD/DVD drive as first booting device (in most of Windows PC CD/DVD drive is first booting device by default) and insert Windows 7 Installation Disk in the drive.
2. On Restarting PC you will see message "Press any key to boot from CD". So you can press any key to start booting (from installation disk) process.
3. Next you will see two options:“Install Windows” and “Repair Windows”. Click “Repair Windows”.

4. Next you will see various options to recover windows. Click on “Command Prompt” option to continue.

5. Type the following commandsin command prompt window:
copy c:\windows\system32\sethc.exe c:\
copy /y c:\windows\system32\cmd.exe c:\windows\system32\sethc.exe

6. Reboot your PC (and take out installation disk)
7. After restart (at login screen) press shift key 5 times. It will show you command prompt window.

8. At command prompt type: net user user_name new_password

For example if you want to set new password 12345 for user Patrick then you can write net user Patrick 12345.
Now you can easily login to windows 7 with new password.
If you don’t have Windows 7 password reset disk (or not able to access command prompt) then no need to worry because there are many password recovery software to reset windows password. These Windows password recovery software provide easiest way to reset windows password in few minutes only.
I hope this article is very helpful for users who want to reset windows 7 password without any software.
READ MORE - How to Reset Windows 7 Password without any Software?

Wednesday, October 31, 2012

How to Enable Windows 8 Picture Password?

-->
Recently Microsoft has launched Windows 8 Operating System with many new and unique features as compared with its earlier version Windows 7. Out of these new and unique features, picture password is one of the features which is very attractive and getting popular as lightening speed. This feature allows its user to prevent unauthorized access by enabling password with the help of picture. In picture password authentication system, user can select any picture (to appear on login screen) and register specific patterns by touching (or dragging) finger on the picture.

If you are Windows 8 user and wanted to enable picture password then you can following these steps as given below.

1. Click "Settings" on the Charms bar.

2. In settings panel click "More PC Settings" -> Click "Users" (on the left side of the screen).

3. On clicking "Users" you will see your account information. From "Sign-in options" click "create a picture password" button.

4. You will see "Picture Password Wizard". In the first screen of wizard you will be asked to select a picture to be used for password.

5. After selecting picture you will need to register (two times) 3 gestures on picture by dragging your finger on the picture. You can draw gestures in any shape like line, circle, triangle etc.

Note : Be careful about the direction in which you draw gestures because they are direction sensitive.

6. If you get success in making same gesture (depending upon some accuracy level) then Windows 8 saves it as picture login password for your account and from next time onwards you need to repeat this gesture to login to your user account in Windows 8.

So, now no need to remember long and complex passwords, login quickly by dragging finger on picture. I am sure you will be very excited to share this great feature with your friends too.
READ MORE - How to Enable Windows 8 Picture Password?

Monday, October 29, 2012

How to Protect MS Office 2003 Documents by Applying Password ?


As we know that technology is growing with lightening speed and there are too many good and bad experience user are facing. Maximum data is now easily available and there is high risk of leaking confidential data. Any un-authorized user can access your data very easily if it is not protected. So, it is very important to protect your data which is saved in MS office word, excel, powerpoint etc. 

I am very well aware that many users are not aware about how they can protect MS office document by applying password. Some users found it very difficult exercise to use passwords. 

If you are working on Microsoft Office 2003 then you can apply the following simple and easy steps to protect MS office document (.doc, .xls, .ppt) by applying password protection.

1. Open the document (.doc, .xls, .ppt) to protect with password

2. Click Tools, then Click Options

3. Click Security tab and then click advanced button.

4. Scroll down the encryption type and click RC4, Microsoft Enhanced RSA and AES Cryptographic Provider. By default, the Encrypt document properties box is checked and the Key Length is 128. Confirm both the fields and click OK

5. Two boxes are available in the Options window: Password to Open and Password to Modify. Type the password in the Password to Open box and click OK. Type the password in the Password to modify box also, if you want reviewers to enter a password before they can save changes to the document. But this password needs to be different from the Password to Open box.

6. Re-enter Password to Open and click OK.

7. Click File and then click Save As or click Save, if you have saved the document.

8. Type the file name in Filename and click Save.

By applying above password protection to MS office document you will get the feeling of security because un-authorized user cannot access your document without your permission unless you share the password with them. It is important to keep strong password which you can easily recall. 

I have read so many questions over the discussion forum where user said they could not recall saved MS office password because it was very complex. In such situation I have given them suggestion to download some recognize Office Password Recovery utility to open the protected MS Office document. For my personal use I always opt for Stellar Phoenix Office Password Recovery utility to recover MS Office document password as it is user friendly and easily recover the password. I would recommend you to protect your MS office document you can surly give a try to this utility. Hope the above steps will surly help you to protect your MS office document.
READ MORE - How to Protect MS Office 2003 Documents by Applying Password ?

Tuesday, October 23, 2012

How to unprotect excel sheet from read only password ?

-->
Password protection is one of the most important features of MS Excel. Password protection feature ensures that only authorized user can see or modify the data of the excel file. This feature allows user to set (mainly) two types of password on excel file: Password to open and Password to modify. First type of password (Password to open) restricts the user from opening the excel file whereas second type of password (Password to modify) can be used to protect excel sheet (or cells) from unauthorized modification.
Many times it happens that the authorized user forget excel file password and hence they also lost access from opening/editing the excel file. In such situation most of the user take help of excel password remover software to recover lost password.
Here I am sharing how you can edit read only password protected excel file without any password remover software.
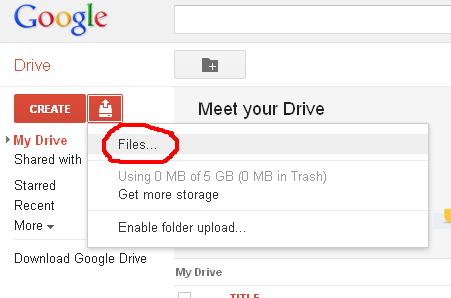
  1. Login into your Gmail account.

  2. Click on documents (or open http://docs.google.com/ after you have login into Gmail account).
  3. Click Upload Document icon.

  4. Browse the file you want to edit and upload it.

  5. Now open the uploaded file with Google spreadsheet (Click File-> Open with ->Google Spreadsheets) and make the desired changes.

  6. Download the edited file as an Excel file.

  7. Now open the downloaded file. It will open in “Protected View”. Click “Enable Editing” to remove read only password permanently. 

Now your file is unprotected from read only password.

This is one of the best method to unprotect excel sheet without using any password remover software. The only limitation of this method is that it can not be used to remove “password to open” excel file. You can recover “password to open” excel file by using excel password recovery software.
READ MORE - How to unprotect excel sheet from read only password ?

Sunday, October 21, 2012

Unprotect Excel Sheet with Brute-Force Attack and Masking Technique


-->
MS Excel provide many features to manage and analyze large volume of data. Graphical representation tools and inbuilt (mathematical, financial, statistical and logical) functions make it very easy for everyone to analyze and summarize data without any special expertise. Besides so many user friendly features, MS Excel also provides a very useful security feature called “Password Protection” to prevent unauthorized access (or modification) of valuable data. This password protection feature of MS Excel allows User to protect entire workbook, individual sheet or cells of a file. 

Many times it happens that Excel user forget the password enabled by them to protect their worksheet. In such situation it is really very difficult to unprotect excel sheet without password remover software. I searched a lot to find methods of removing excel password without software but did not get even a single method which can do this. From my search I analysed that almost all the excel password remover software are based on two features: Brute-Force Attack Technique and Masking Technique.

Let me explain you how Brute-Force Attack and Masking Technique help to unprotect excel sheet. 

Brute-Force Attack Technique – This technique involves making all possible permutations of characters (lower case letters, upper case letters, special characters, numbers) of your password. All excel password breaker software provides you the option to specify the probable length and characters in your password. On the basis of the password length and characters all possible permutations are made and run through for checking. Total time taken by software to recover excel password directly depends on the total number of permutations (which in turn depends on the length and complexity of your password). 

For example if your password is 3 characters long and include numbers, Upper case and lower case letters then there will be total 62 * 62 * 62 = 238328 guesses or permutations (Here 62 = 26 lower case letters +26 upper case letters + 10 numbers).

Masking Technique – Many time it happens that user remember first few (or any) characters of their password but not able to recall full password. In such situation Masking Technique allows user to specify the initial (remember) characters and replace the unknown characters by '?'. This helps Brute-Force process to search for the unknown characters only and hence reduces the time to crack excel password. 

Overall we can say that because of Brute-Force Attack and Masking Technique excel password remover software has very high success rate. So, if you forget your excel file password then you can use any excel password recovery software based on Brute-Force Attack and Masking Technique.
READ MORE - Unprotect Excel Sheet with Brute-Force Attack and Masking Technique

Tuesday, October 16, 2012

How to Solve the Problem “Outlook keeps asking for password”?

Many Outlook users complain that Outlook keeps asking for password (network password) repeatedly. Situation becomes worse when “Enter Network Password” pop-up message appears after every 20-30 seconds. Pop-up keeps on flashing even the user has entered correct username and password. Enabling the “Save Password” or “Remember Password” also does not solve the problem.

The possible reason for this problem can be:
  • Corrupted Outlook profile.
  • Registry has incorrect Protected Storage System information.
Solving corrupted Outlook profile problem:

This problem can be solved by creating a new outlook profile and connecting this profile to the .pst file of old profile (or damaged profile).
  1. Create new outlook profile.
  2. Locate the .pst file used by damaged profile (you can find it at location C:\Documents and Settings\ user_name \Local Settings\Application Data\Microsoft\Outlook\Personal Folders.pst).
  3. Configure new profile to use .pst file of old profile. This can be done by following the given below steps (based on MS Outlook 2010):
    1. Open Outlook.
    2. File tab -> Info -> click Account Settings (in Outlook 2007 Account Settings option is available in Tool menu, in Outlook 2003 and 2002 Tool -> Options).
    3. E-mail tab-> click your email account. (in Outlook 2003 and 2002 Mail Setup -> Email Accounts -> View or change existing e-mail accounts - > Next)
    4. In the "Account Settings" dialog box Click "Change Folder".
    5. Click New Outlook Data File-> click Office Outlook Personal Folders File-> click OK.
    6. Browse and locate the .pst file of old profile-> click OK.
Solving Incorrect Registry information Problem:
  1. Close all the programs
  2. Click Start -> Run
  3. Enter "Regedit" and Click "Ok"
  4. Locate the folder : HKEY_CURRENT_USER\Software\Microsoft\Windows\CurrentVersion\Explorer\User Shell Folders
  5. Edit Menu-> New-> Expandable String Value
  6. Name it as "AppData"
  7. Double click new entry and write "%USERPROFILE%\Application Data" in "Value data field" box.
  8. Click "OK" and Close the registry editor.
Note: Before following this solution make sure that you have created a backup copy of registry.

I hope that with the help of these two methods you can make outlook to remember your mail password. So no more complaints that Outlook keeps asking for password.
READ MORE - How to Solve the Problem “Outlook keeps asking for password”?

Tuesday, September 4, 2012

Some Unique Features of WinRAR


WinRAR is one of the most famous data compression tool for windows and Mac Operating Systems. Users can simultaneously compress many files into a single WinRAR file with the help of this tool. The compressed WinRAR files are very easy to send as attachment in mails because they have much smaller size as compared to the size of files in uncompressed form. This is the main feature of WinRAR which makes it so popular among users for compressing files before sending them.

WinRAR has many features which make the data compression tool unique in the crowd. Some of these features are:


  1. It supports almost all famous compression formats like RAR, ZIP, CAB, ISO, ACE, ARJ 7-Zip etc.

  1. WinRAR has the ability to automatically analyze files and selects best compression technique.

  1. With the help of WinRAR a user can split a large file into many smaller files thus making it easy to send larger files through email.

  1. WinRAR allow users to specify the folder to extract the files or it can also create the folder itself (having same name as that of archive file) to extract the files.

  1. WinRAR also provides the functionality to scan the files (which are prior to extraction) by connecting with external antivirus programs.

WinRAR also provides the facility to protect your data with password along with compressing it. Users feel comfortable with its 128 bit password encryption technique while sending very sensitive and secret data over internet. This feature of WinRAR makes it to be considered as the most suited data compression tool to send file over internet. The 128 bit AES (Advanced Encryption Standard) of WinRAR excludes the possibility of any unauthorized access to the archive content. Even you will not be able to extract the archive content if you forget its password or enter it wrongly. So you must be very careful if you want to use this feature of WinRAR. You should try to set password which can be recalled by you very easily. Though lots of password recovery software available on the net those are capable enough to recover password from any kind of password encryption.
READ MORE - Some Unique Features of WinRAR

LinkWithin

Related Posts Plugin for WordPress, Blogger...